Version Control with Git and GitHub
Our discussion of reproducibility and its importance to scientific programming and bioinformatics touched on the challenge of keeping track of the “final” version of an analysis in the face of data exploration and troubleshooting. Consider your own history of writing code for data manipulation and analysis. What strategies have you used to keep track of multiple versions of an analysis? Common approaches include saving multiple versions of files with different names, repeatedly pasting the same chunk of code with slight modifications in the same script, and closed-source, cloud-based file storage solutions like Dropbox and Google Drive. The latter provide some degree of version control, i.e. snapshots of the version of a file at a particular time point. But they suffer from many of the disadvantages of proprietary software, and are not optimized for writing computer code, plain text files, or working collaboratively.
Software developers have created a powerful solution to this common dilemma, with clear benefits to conducting reproducible research in ecology, evolution, and related fields. Pairing a version control system (VCS; local software) with online hosting sites (to distribute and back up file versions) allows continuous, collaborative editing across dispersed contributers, annotation of different versions of files, and an easy way to share open-source scientific software and documents for review and to aid other researchers. Though the learning curve can be steep, learning to effectively use a VCS and online repository is a minimum standard for conducting ethical, transparent computational research—especially when working with genomic data. It also will open the door to using myriad task-specific software packages written by the vibrant scientific computing community. In this class, we will learn the basics of Git and the online hosting service GitHub, though the principles discussed apply to other platforms.
Installation
If you have not yet worked with Git and GitHub—or have not yet downloaded Git for Windows to obtain a bash emulator—you will likely need to install the appropriate version of Git for your operating system. To do so, follow the instructions on this website. Once you have completed the installation, open your terminal and type the following command:
gitAssuming the output is a lengthy message of command options, you have successfully installed Git.
Linking Git and GitHub
After installing Git, you’ll need a GitHub account to link to it (assuming you don’t already have one). To do so, click “Sign Up” on the website; detailed instructions are available here. For better or worse, you will also have to activate two-factor authentication (2FA) in some way. Make sure you verify your email address.
Next, you’ll need to tell Git who you are, using the exact user.name and user.email previously provided to GitHub:
git config --global user.name "Jean-Baptiste Lamarck"
git config --global user.email "lamarck@mnhn.fr"
Verify your information has been entered correctly with the following command:
git config --global --listAfter this, you’ll need to cache your credentials to avoid being prompted to enter a username and password everytime you interact with a remote repository. This is one of the trickier steps to getting Git and GitHub playing nicely together, and I anticipate some of you will have issues.
- To start, navigate to Settings → Developer Settings.
- Click “Tokens (classic)” under “Personal access tokens”.
- Click “Generate new token” and select “Generate new token (classic)”.
- In the “Note” field, type something informative, avoiding spaces (e.g., “bioe591-token”).
- Select an expiration date of June 2026 or later.
- Under “Select scopes”, click the main “repo” box, and then “Generate token”.
- IMMEDIATELY save the text string that appears to a single line of a text editor—this will quickly disappear, and you’ll need to start over.
Once you’ve created a PAT, you’ll want to save it on your computer’s credentialing system. The exact steps will differ by operating system.
Mac OS: Type the following command:
git config --global credential.helper osxkeychainNext, type a command that requires a link between Git and GitHub:
git ls-remote https://github.com/USERNAME/this-repo-does-not-existYou should be prompted to enter your username and password. When the “password” prompt appears in the terminal, paste the entire PAT string from your plain text document into the field. You will NOT see anything appear; this is normal. Hit enter; the command will then indicate the repository does not exist (this is expected). You should now be all set to use Git and GitHub without repeated authentication requests.
Windows: Type the following command:
git config --global --get credential.helperLikely output will be manager. If this does not appear, configure it explicitly:
git config --global credential.helper managerYou will then need type a command that requires a link between Git and GitHub:
git ls-remote https://github.com/USERNAME/this-repo-does-not-existAs with Mac OS, this will prompt you to enter your username, then your password; you may paste the PAT string in the password field and hit enter. It will save to your computer’s credential manager automatically.
Linux: Enter the following commands:
git config --global credential.helper store
chmod 600 ~/.git-credentials # ensure you have appropriate permissions to write to this file
As with the other operating systems, this will store your PAT after your are prompted to enter it:
git ls-remote https://github.com/USERNAME/this-repo-does-not-exist(Unlike the other OS, it will be in an easily-found dotfile: ~/.git-credentials. We will use a separate authentication protocol when working from the cluster, to be introduced later.)
Git and GitHub Basics
With a bit of luck, the previous steps should have been relatively painless and you should now be ready to begin your first Git and GitHub workflow. To start, navigate to GitHub and create a repository (via the “Repositories” tab and then the “New” button). Name your repository something associated with this class and your initials, or an otherwise informative and unique combination. You may also enter a brief description of the contents of the repository in the provided bar. Leave all other options blank for now. The new repository should now open as a stand-alone webpage. Under the green “<> Code” button, copy the link under the HTTPS tag. Open your terminal, navigate to a directory where you keep homework or research projects, and make a new directory for this class:
mkdir bioe591_workYou next want to initialize this as Git repository:
git initThis command will then create a new dotfile (i.e., a hidden file, technically a directory) with the name of .git. Its contents can be made visible with the following command, though you can ignore them now and always:
ls .gitYou will then link your local repository to its online counterpart. In the command below, origin is an alias for the URL that Git is assigning to be a remote copy of your local work. (You’ll want to replace the link below with the link to your new GitHub repository, of course.)
git remote add origin https://github.com/USERNAME/class-repoOnce this is done, it’s time to test out a sample workflow. We can start by creating a file called README.md, which by default will be displayed on as the landing page for your GitHub repository, complete with Markdown formatting. For the purposes of the tutorial, we can create this with a single line of code:
echo "# BIOE591 Coursework Repository" > README.md(However, you should feel free to edit this as you see fit, either with nano or another text editor of your choice—for now, the contents don’t matter.)
Next, we’ll create a special dotfile called .gitignore. This is not strictly necessary, but can be helpful if you want to avoid adding particular files to your remote repository. Consider a scenario in which you have a folder filled with sequencing reads (raw_reads/). These data are large and cumbersome, and you won’t want to hsot them on GitHub itself. Add them to your .gitignore with the following command:
echo "raw_reads/" > .gitignoreA second line can be added to the same file using >>. On Mac OS systems, for example, a pesky dotfile called .DS_Store is often present, and never needed in a repository. Just to be sure (and as an exercise regardless of your operating system), let’s add it as well, and then print the contents of the file to the screen:
echo ". DS_Store" >> .gitignore
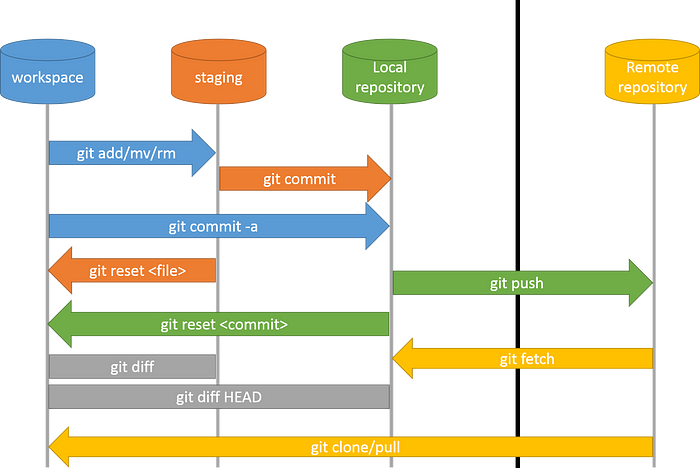
cat .gitignoreWe are now ready to update our remote repository. To do so, we will take a series of steps that 1) tell Git which files to track (git add); 2) move a snapshot of the version of the files from our current working directory to a staging area (git commit); 3) upload these file version to GitHub (git push). Let’s work through these one by one. To begin, we need to begin tracking the contents of the repository. The quickest way to do this is to type the following command, where . indicates the entire contents of the directory:
git add .This is exactly equivalent to typing git add README.md followed by git add .gitignore, i.e. manually tracking both files (a move which can sometimes be useful). By default, git add will only impact files with changed contents (including brand new files). Next, you need move these tracked files to a staging area, where you will add a short note (using the -m flag) describing the reason for any revisions, deletions, or additions:
git commit -m "add first files" At this point it is time for a brief digression. We have already discussed the difference between your working directory, an abstracted “staging area”, and your remote repository. For the vast majority of work you are likely to do, waiting until code is ostensible bug-free to add, commit, and push changes within your working directory to a remote repository is likely to be best practice. For more complex projects, however, it can be useful to have a local copy of your code to modify and experiment with while keeping the last working version in safe condition. Git’s solution to this is called branching. By default, the first version of a particular project is assigned to a branch called main, which is initiated with your first commit. You can verify this by typing the following command:
git branchA suite of commands are associated with creating, switching between, and ultimately merging work in different branches. These are beyond the scope of our introduction, but if you are interested in a deeper understanding, I recommend visiting Git’s tutorial on the topic. For now, it will suffice to know that your work in this class will always be in main.
We now return to our workflow. Recall that we have “committed” a set of files (README.md and .gitignore) to a staging area, with a message describing our work. We are now ready to add these files to our online repository:
git push -u origin mainHere, the command -u sets “upstream tracking”—a fancy way of saying your local changes will always get sent to the online repository when you push, and not anywhere else. (Practically, this means you can type git push without the rest of the command whenever you work in this repository from now on.) You can now navigate the the url for your remote repository. Unless something has gone wrong, you should see it has been updated to reflect the tracked, commited contents of your local directory. Congratulations! You’ve now effectively used Git and GitHub. Most of the time, this is all there is to it. However, it will be helpful to address two other common uses of version control before concluding. First, let’s learn how to revert to an earlier version of a particular project. To do so, we’ll edit our README, commit it, and push it again:
echo "questionable edit" >> README.md
git add README.md
git commit -m "edit I will not regret "
git push
Your GitHub repository should now show a modified README.md file. Unfortunately, this tweak breaks your data analysis pipeline, and you decide you need to return to the script you were working with earlier. To do so, click the link that reads “2 Commits” below the green “Code” button. Here, you will see your full commit history: two file versions, each with a unique code in a format similar to b38e27a. (This same history can be shown locally with the command git log --oneline.) The command git checkout can be paired with a commit code to instantly revert to that snapshot of your work:
git checkout c66e60b -- .(The command -- is a delimiter telling Git that everything afterwards should not be interpreted as a command; the . is a wildcard indicating that you wish to change the entire contents of the directory.).
Typing git status should show that you now have changes waiting to be committed. Add, commit, and push this reversion, then confirm that your GitHub repository has been updated appropriately.
Our final Git lesson involves deliberately breaking something, which we do with the hope that it will help you troubleshoot accidental errors in the future. Back on your GitHub repository, navigate to README.md and click the edit button (a sketch of a pencil on the righthand side of the document when seen from the landing page). Doing so opens a text editor. In the contents of the file, add a line reading “github edit” or similar. You will be prompted to commit this edit—go ahead and do so.
Next, return to your working directory. Using nano or another text editor, edit your local copy of README.md, adding the line “local edit”. Save, add, and commit. Now, attempt to push your work to GitHub (git push). You should see an error message that reads Updates were rejected because the remote contains work that you do not have locally. This is usually caused by another repository pushing to the same ref. You may want to first integrate the remote changes (e.g., 'git pull ...') before pushing again.
In general, following the advice provided by error messages is solid practice. Type git pull. The following text should appear:
Auto-merging README.md
CONFLICT (content): Merge conflict in README.md
Automatic merge failed; fix conflicts and then commit the result.
This is a common sticking point and can be one of the most difficult aspects of working with a VCS for beginners. Luckily, the solution is relatively simple. Using nano or another editor, open the README.md file. You’ll see text similar to the following:
<<<<<<< HEAD
local edit
=======
github edit
>>>>>>> origin/main
The arrows (>>>) and equals signs (===) have been added by Git to highlight a conflict between the two versions. All the software is doing is prompting you to choose between the two file versions (or combine them). Edit as you see fit—which typically involves removing those delimiters—add, commit, and push. Crisis averted!
Finally, it can be useful to visualize exactly how your working directory and remote repository have changed and merged over time. To do so, use the following command:
git log --oneline --graphSummary
You should now feel comfortable—well, at least understand the purpose, in the abstract—of the following commands:
git status
git add
git commit
git pull
git push
git log --oneline --graph
git checkout -b
With time, these should become second nature, and help you develop efficient, safe, and reproducible workflows.
Today’s homework is fairly simple, and intended to reinforce the skills you have just built:
- In the repository you made for this class, create a new subdirectory called
homework/. Move your bash script from last week (01_homework_<your_name>.sh) inside it.
- Edit your
README.mdfile to describe the overall structure of your repository and its subdirectories. This file will be my guide to finding to your homework assignments, so the more informative, the better! - Add, commit, and push the script to GitHub.
- Return to
01_homework_<your_name>.sh. Add a line ofbashcode to the end of the script that prints “DONE!” or something similar to the screen after counting all files in the directory. Add, commit, and push this new version to GitHub. (I will be checking the commit log on your account, so make sure you add a message signaling this change.)